A little bit of boundaries?
- Austeja Simaityte
- Dec 9, 2023
- 1 min read

Well, the first time I let a child design my nails, it was interesting, to say the least... There were some difficulties and some uncertainty about whether I liked the design.
Therefore, this time, as another one of my little friends wanted to design my nails, I put some boundaries in place. The main points she needed to cover were:
pretty neutral nails,
integrating the Christmas vibe,
needed to match with different outfits.
With these points and a little influence from my imagination, she came up with the first draft of the design:


While it looked pretty good already, I still thought something was missing; therefore, I added some short white dashes between the red and green colours and, at the same time, created the final design:
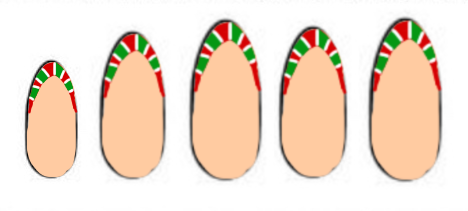

The finished look

Even though it took a pretty long time to draw each and every dash, the design turned out even better than I thought it would, and in the end, it started to bring out the feeling of Christmas even more.
Used nail polish
"STUDIOS DIDIER" hard base, "SHIELD"
"DIDIER LAB" gel polish, "NATURAL LOOK", NO20
"DIDIER LAB" gel polish, "IMPULSE"
"DIDIER LAB" gel polish, "BEATRICE"
"DIDIER LAB" gel polish, "BLANC"
"STUDIOS DIDIER" super shiny top coat, "SUPER SHINY"
Used tools
For the nail preparation:
Cutticle nippers STALEKS CLASSIC 10
Electric nail file MARATHON 3 CHAMPION + H200
„DIDIER LAB“ nail buffer, grey, 100/180
"DIDIER LAB" nail file, half moon form, SPEEDY ZEBRA, 180/240
For the design:
DUAL LED U1 84W nail lamp
"DIDIER LAB" nail brush, NO6, OVAL (TIGER TORAY)
"DIDIER LAB", nail brush, NO5, (WINE RED TORAY)
Tips & Comments
- It's better to apply a thinner layer of nail polish than a thicker one.
- Start out with the red French tip, and then draw green as well as white dashes.


Comments